
# Lab 3 - Integrating an app
In the last laboratory, we will learn how to modify a existing application in order to work with Jaeger. To cover different implementations of Jaeger Client (opens new window), it has been selected dvoitekh/kubernetes-microservices (opens new window), a OSS Simple Kubernetes-based app, which contains 3 services:
- Flask (Python) (opens new window) microservice (management of applications' logs).
- Sinatra (Ruby) (opens new window) microservice (OAuth server - user registration and login).
- MongoDB
# 1. Install the application as is in K8s
Before anything else, we are going to install the application without any modification to check that works properly.
Clone the modified application repo:
git clone https://github.com/alvsanand/kubernetes-microservices

cd kubernetes-microservices
Build flask-app Docker image and upload to minikube:
eval $(minikube docker-env)

docker build -t flask-app flask-app
Build sinatra-app Docker image and upload to minikube:
docker build -t sinatra-app sinatra-appInstall kubernetes-microservices:
kubectl create namespace kubernetes-microservices

kubectl apply -n kubernetes-microservices -f kubernetes/secrets.yml

kubectl apply -n kubernetes-microservices -f kubernetes/mongo-deployment.yml
kubectl apply -n kubernetes-microservices -f kubernetes/mongo-service.yml

kubectl apply -n kubernetes-microservices -f kubernetes/flask-deployment.yml
kubectl apply -n kubernetes-microservices -f kubernetes/flask-service.yml

kubectl apply -n kubernetes-microservices -f kubernetes/sinatra-deployment.yml
kubectl apply -n kubernetes-microservices -f kubernetes/sinatra-service.yml

kubectl apply -n kubernetes-microservices -f kubernetes/ingress.yml
Test the application:
K8S_INGRESS_IP=$(kubectl get -n observability ingress -o jsonpath='{.items[0].status.loadBalancer.ingress[0].ip}')

USER="test_user"
PASSWORD="very_scure_password"
USER_CREDENTIALS='{"username": "'$USER'", "password": "'$PASSWORD'"}'

# 1. Create user
curl -Ss -H "Content-Type: application/json" -d "$USER_CREDENTIALS" "http://$K8S_INGRESS_IP/users"

# 2. Obtain JWT Token
# CAUTION: jq command must be installed
JWT_TOKEN=$(curl -Ss -H "Content-Type: application/json" -d "$USER_CREDENTIALS" "http://$K8S_INGRESS_IP/login" | jq -r '.token')

# 3. Create application
curl -Ss -H "Authorization: Bearer ${JWT_TOKEN}" -H "Content-Type: application/json" -d '{"name": "test_app"}' "http://$K8S_INGRESS_IP/applications"

# 4. List applications
curl -Ss -H "Authorization: Bearer ${JWT_TOKEN}" "http://$K8S_INGRESS_IP/applications"

# 5. Add some logs to application "1"
curl -Ss -H "Authorization: Bearer ${JWT_TOKEN}" -H "Content-Type: application/json" -d '{"ip_address": "1.2.3.4", "request": {"some_parameter_a": "some_value_a_1", "some_parameter_b": "some_value_b_1"}}' "http://$K8S_INGRESS_IP/logs/1"
curl -Ss -H "Authorization: Bearer ${JWT_TOKEN}" -H "Content-Type: application/json" -d '{"ip_address": "1.2.3.4", "request": {"some_parameter_a": "some_value_a_2", "some_parameter_b": "some_value_b_2"}}' "http://$K8S_INGRESS_IP/logs/1"
curl -Ss -H "Authorization: Bearer ${JWT_TOKEN}" -H "Content-Type: application/json" -d '{"ip_address": "1.2.3.4", "request": {"some_parameter_a": "some_value_a_3", "some_parameter_b": "some_value_b_3"}}' "http://$K8S_INGRESS_IP/logs/1"

# 7. List logs of application "1"
curl -Ss -H "Authorization: Bearer ${JWT_TOKEN}" "http://$K8S_INGRESS_IP/logs/1"
Delete the application resources:
kubectl delete namespace kubernetes-microservices
# 2. Integrating flask-app with Jaeger
Firstly, flask-app will be modified. Therefore, we will add the necessary code to application and the deployment configuration in order to work with Jaeger.
Add Flask-OpenTracing (opens new window) dependencies:
echo '
Flask-OpenTracing==1.1.0
jaeger-client==4.3.0' >> flask-app/requirements.txt
Modify flask-app/config.py adding
JAEGERenvironment variables:JAEGER_AGENT_HOST = os.getenv('JAEGER_AGENT_HOST', 'jaeger') JAEGER_AGENT_PORT = os.getenv('JAEGER_AGENT_PORT', "6831")Edit flask-app/app/views.py adding the Jaeger configuration to the Flask app:
######################################
# Add this after line "from app.serializers import ApplicationSerializer, LogSerializer"
######################################
from jaeger_client import Config
from flask_opentracing import FlaskTracing


def initialize_tracer():
    config = Config(
        config={'sampler': {'type': 'const', 'param': 1},
                'logging': True,
                'local_agent':
                {'reporting_host': app.config
                 ['JAEGER_AGENT_HOST'],
                 'reporting_port': app.config
                 ['JAEGER_AGENT_PORT']}},
        service_name="flask-app")

    return config.initialize_tracer()


jaeger_tracer = initialize_tracer()
tracing = FlaskTracing(jaeger_tracer, trace_all_requests=True, app=app)
######################################
Modify kubernetes/flask-deployment.yml adding
JAEGERenvironment variables:###################################### # Add this after line " value: "3000000"" ###################################### - name: JAEGER_AGENT_HOST value: jaeger-workshop-agent.observability.svc.cluster.local - name: JAEGER_AGENT_PORT value: "6831" ######################################
# 3. Integrating sinatra-app with Jaeger
Next, it is time to modify simatra-app, the Ruby service. We will also add the necessary code to application and the deployment configuration in order to work with Jaeger.
Add jaeger-client-ruby (opens new window) dependencies:
echo "
gem 'jaeger-client'
gem 'rack-tracer'
gem 'opentracing'
" >> sinatra-app/Gemfile
Edit sinatra-app/app.rb adding the Jaeger configuration to the Ruby app:
######################################
# Add this after line "require './mongoid'"
######################################

require 'jaeger/client'
require 'opentracing'
require 'rack/tracer'
######################################

######################################
# Add this after line "  set :port, ENV['APP_PORT']"
######################################

  OpenTracing.global_tracer = Jaeger::Client.build(host: ENV['JAEGER_AGENT_HOST'], port: ENV['JAEGER_AGENT_PORT'].to_i, service_name: 'sinatra-app')
  use Rack::Tracer
######################################
Modify kubernetes/sinatra-deployment.yml adding
JAEGERenvironment variables:###################################### # Add this after line " value: "3000000"" ###################################### - name: JAEGER_AGENT_HOST value: jaeger-workshop-agent.observability.svc.cluster.local - name: JAEGER_AGENT_PORT value: "6831" ######################################
# 4. Propagating the tracing HTTP headers
Now, we are able to trace all requests from the Python and Ruby services. However, the requests made from flask-app to sinatra-app are not correlated because the span is not propagated. To solve that, we have to modify again flask-app to do so.
Add opentracing-instrumentation (opens new window) dependency:
echo '
opentracing-instrumentation===3.3.1
tornado==5.1.1' >> flask-app/requirements.txt
Edit flask-app/app/views.py adding the Jaeger configuration to the Flask app:
######################################
# Add this after line "from flask_opentracing import FlaskTracing"
######################################
from opentracing_instrumentation.client_hooks import install_all_patches
######################################

######################################
# Add this after line "tracing = FlaskTracing(jaeger_tracer, trace_all_requests=True, app=app)"
######################################
install_all_patches()
######################################
# 5. Adding children spans
There is only left one last change into the code. As we have seen earlier, it is very important to trace all services that could create bottlenecks in the system and our MongoDB database is our biggest candidate. Therefore, we are going to add children traces to flask-app which will trace all the call to MongoDB.
This is the plan:
- Create a decorator so we are able to trace every method of the class
app.modeles.BaseRecordwhich is a MongoDB wrapper class. - This decorator will create a child span with some information about the operation performed into MongoDB.
- We will add the decorator to all methods of the class
app.modeles.BaseRecordthat actually perform an operation to MonogoDB.
Let`s go and edit flask-app/app/models.py adding the children spans to the MongoDB wrapper class:
######################################
# Add this after line "                app.config['MONGO_PORT'])[app.config['MONGO_DB_NAME']]"
######################################


def tracing_method_decorator(decorated_function):
    from flask import request

    def trace(*args, **kwargs):
        try:
            from app.views import jaeger_tracer, tracing

            current_span = tracing.get_span(request)

            cls = args[0]

            with jaeger_tracer.start_span('mongodb', child_of=current_span) \
                    as child_span:
                child_span.set_tag('mongodb.collection', cls.COLLECTION.name)
                child_span.set_tag('mongodb.operation',
                                   decorated_function.__name__)
        except Exception as e:
            print("Error while tracing method: {}".format(str(e)))
        finally:
            return decorated_function(*args, **kwargs)
    return trace
######################################

######################################
# Add this after lines "    @classmethod"
######################################
    @tracing_method_decorator
######################################
# 6. Installing modified version of the application in k8s
After all changes are performed, it is time to install again the application with the modifications.
Rebuild flask-app Docker image and upload to minikube:
docker build -t flask-app flask-appRebuild sinatra-app Docker image and upload to minikube:
docker build -t sinatra-app sinatra-appInstall kubernetes-microservices:
kubectl create namespace kubernetes-microservices

kubectl apply -n kubernetes-microservices -f kubernetes/secrets.yml

kubectl apply -n kubernetes-microservices -f kubernetes/mongo-deployment.yml
kubectl apply -n kubernetes-microservices -f kubernetes/mongo-service.yml

kubectl apply -n kubernetes-microservices -f kubernetes/flask-deployment.yml
kubectl apply -n kubernetes-microservices -f kubernetes/flask-service.yml

kubectl apply -n kubernetes-microservices -f kubernetes/sinatra-deployment.yml
kubectl apply -n kubernetes-microservices -f kubernetes/sinatra-service.yml

kubectl apply -n kubernetes-microservices -f kubernetes/ingress.yml
# 7. Testing the application
Finally, let's go test the application and check Jaeger for the service traces.
Test the application:
K8S_INGRESS_IP=$(kubectl get -n observability ingress -o jsonpath='{.items[0].status.loadBalancer.ingress[0].ip}')

USER="test_user"
PASSWORD="very_scure_password"
USER_CREDENTIALS='{"username": "'$USER'", "password": "'$PASSWORD'"}'

# 1. Create user
curl -Ss -H "Content-Type: application/json" -d "$USER_CREDENTIALS" "http://$K8S_INGRESS_IP/users"

# 2. Obtain JWT Token
# CAUTION: jq command must be installed
JWT_TOKEN=$(curl -Ss -H "Content-Type: application/json" -d "$USER_CREDENTIALS" "http://$K8S_INGRESS_IP/login" | jq -r '.token')

# 3. Create application
curl -Ss -H "Authorization: Bearer ${JWT_TOKEN}" -H "Content-Type: application/json" -d '{"name": "test_app"}' "http://$K8S_INGRESS_IP/applications"

# 4. List applications
curl -Ss -H "Authorization: Bearer ${JWT_TOKEN}" "http://$K8S_INGRESS_IP/applications"

# 5. Add some logs to application "1"
curl -Ss -H "Authorization: Bearer ${JWT_TOKEN}" -H "Content-Type: application/json" -d '{"ip_address": "1.2.3.4", "request": {"some_parameter_a": "some_value_a_1", "some_parameter_b": "some_value_b_1"}}' "http://$K8S_INGRESS_IP/logs/1"
curl -Ss -H "Authorization: Bearer ${JWT_TOKEN}" -H "Content-Type: application/json" -d '{"ip_address": "1.2.3.4", "request": {"some_parameter_a": "some_value_a_2", "some_parameter_b": "some_value_b_2"}}' "http://$K8S_INGRESS_IP/logs/1"
curl -Ss -H "Authorization: Bearer ${JWT_TOKEN}" -H "Content-Type: application/json" -d '{"ip_address": "1.2.3.4", "request": {"some_parameter_a": "some_value_a_3", "some_parameter_b": "some_value_b_3"}}' "http://$K8S_INGRESS_IP/logs/1"

# 7. List logs of application "1"
curl -Ss -H "Authorization: Bearer ${JWT_TOKEN}" "http://$K8S_INGRESS_IP/logs/1"
Go to the Search page in the Jaeger UI.
Select
flask-appin the Service drop-down list to filter the traces.Click Find Traces.
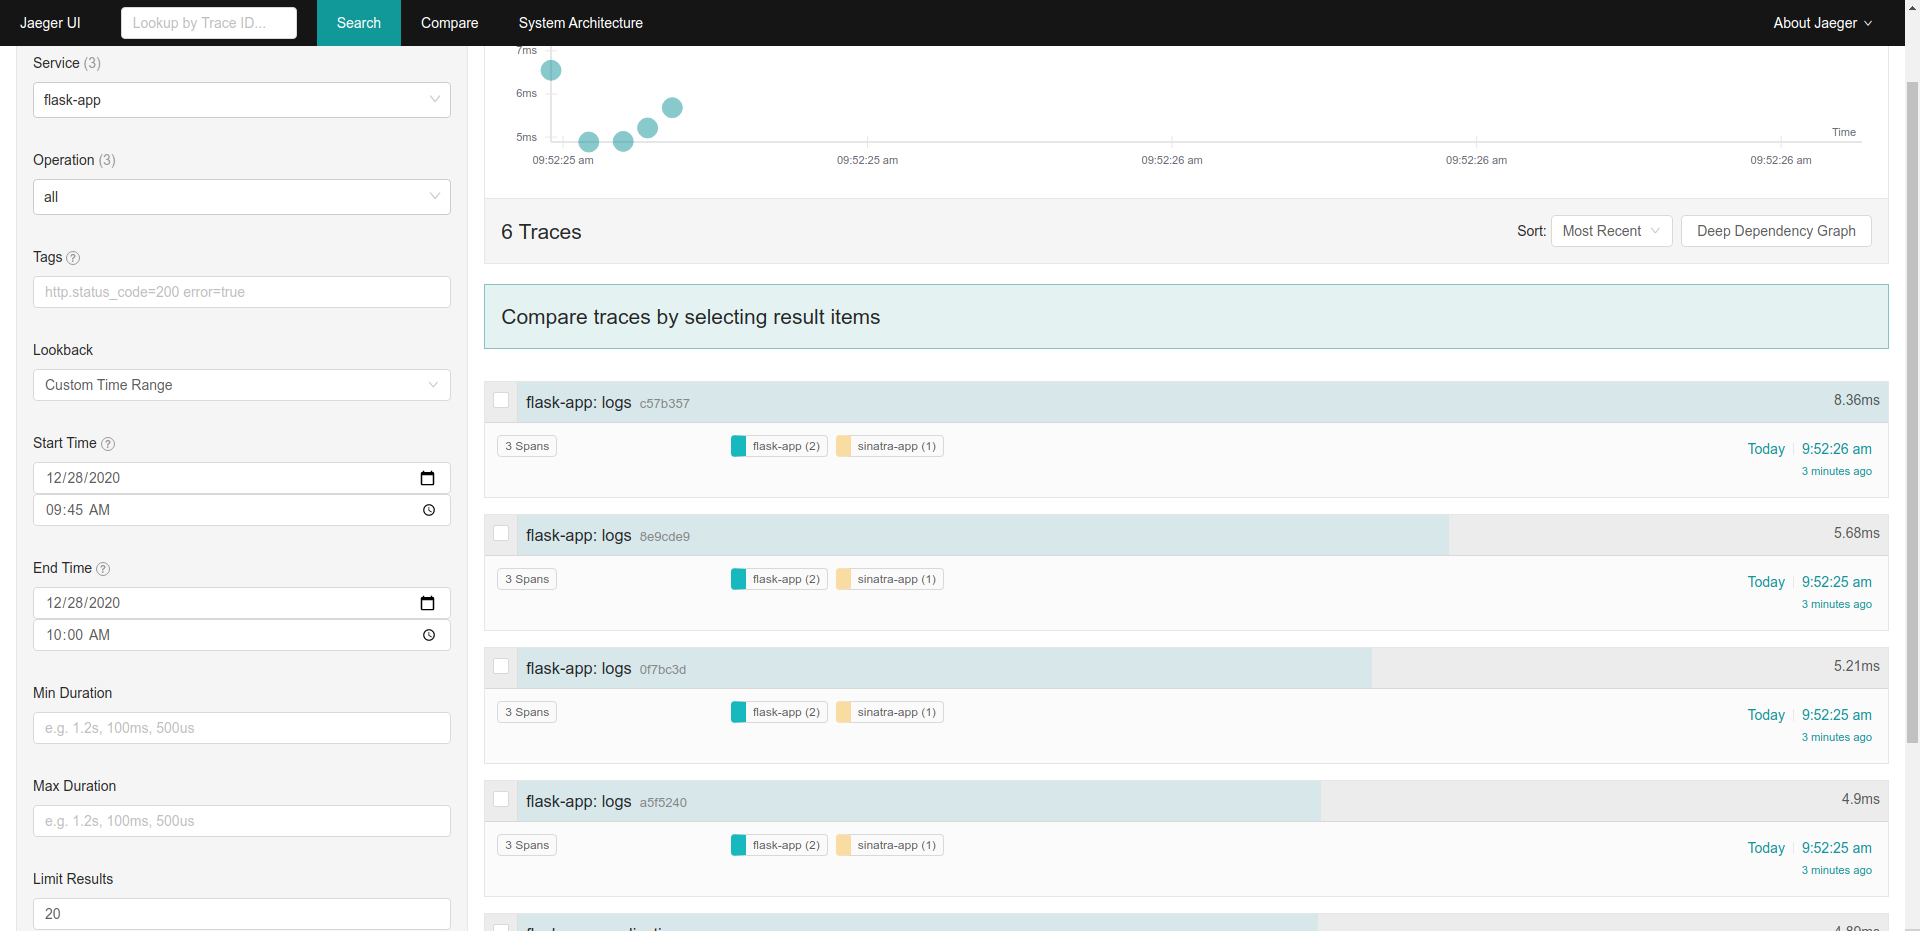
Next, click in one of the
logstrace on the right side.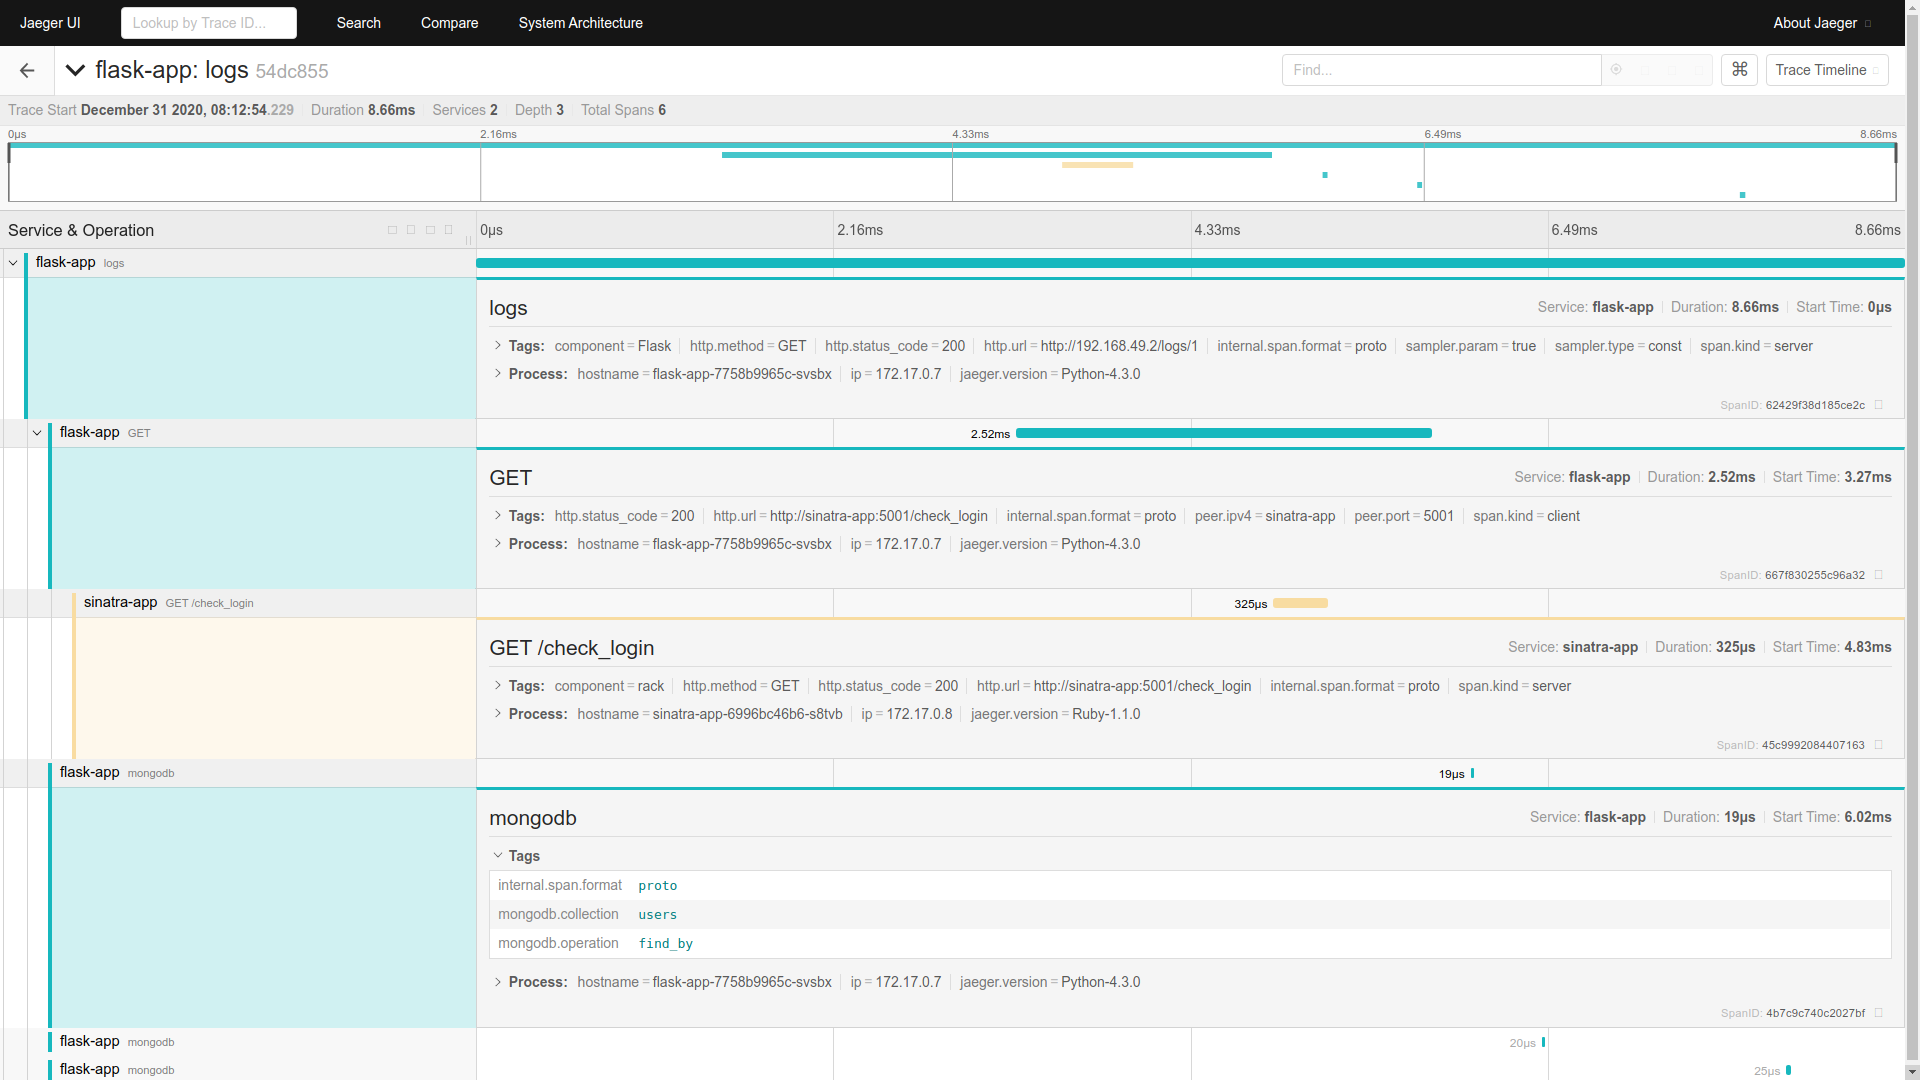
This is the END!!!
You have reached the end of the workshop. I hope that you have now a good overview of Distributed Tracing (opens new window) and Jaeguer (opens new window). For sure, you are more confident in being able to use tracing in your new developments.
Finally, I expect that you have enjoyed doing the different laboratories of this workshop because this was designed to do so.
Thanks dude!